
This really answered my problem, thanks!
Dell powerstore relation between Resilency set and Dynamic resilency engine
Jan 26, 2025
Deep dive into Dynamic Resiliency Engine (DRE) vs Resiliency set
-A resiliency set is a group of disks (by default 25 disks) form a failure domain.
-DRE is PowerStore’s default striping and redundancy mechanisms. It dynamically adapts to disk layouts using striping configurations like 4+1 or 8+1
Now, let us talk about the challenge: When comparing 4+1 and 8+1 configurations within a resiliency set with one-disk failure protection, is there any impact on availability?
Let’s break this down and explain why the stripe choice (4+1 vs. 8+1) still matters, even within the constraints of one-disk failure protection.
Resiliency Set Behavior: One-Disk Failure Protection
In PowerStore:
• A resiliency set protects against one disk failure by default.
• If two disks fail in the same resiliency set, the system cannot guarantee data recovery, regardless of whether you use 4+1 or 8+1.
• Therefore, the stripe configuration (4+1 vs. 8+1) impacts how the system behaves during a single disk failure and recovery process.
Comparison: Availability Perspective with One-Disk Failure Protection
1. Fault Isolation
• In a 4+1 configuration:
• Each stripe spans 5 disks (4 data + 1 parity), so fewer disks are involved per stripe.When a disk fails, fewer stripes are affected, which reduces the risk of overlapping failures or cascading issues.
• In an 8+1 configuration:
• Each stripe spans 9 disks (8 data + 1 parity), so a single disk failure affects more stripes.More data blocks are impacted, and the risk of overlapping failures increases.
Conclusion:
• 4+1 provides better fault isolation, which reduces the impact of single disk failure within the resiliency set.
2. Rebuild Times
• With 4+1, a smaller number of disks (4 data + 1 parity) contribute to each stripe. When a disk fails:
• The system reads only 4 data blocks to reconstruct the missing data.
• Rebuild times are faster because the workload is distributed across fewer disks.
• With 8+1, more disks (8 data + 1 parity) are involved in each stripe. When a disk fails:
• The system reads 8 data blocks to reconstruct the missing data.
• Rebuild times are slower, and the system spends more time in a degraded state, increasing the risk of further failures.
Conclusion:
• 4+1 provides faster rebuild times, improving system availability by reducing the window of vulnerability.
3. Risk of Multiple Failures During Rebuild
During a rebuild:
• In 4+1, fewer stripes depend on the failed disk, and fewer disks are involved in the recovery process. This lowers the risk of multiple disk failures affecting the same stripe during the rebuild.
• In 8+1, more stripes depend on the failed disk, and more disks are involved in the recovery process. This increases the risk of another disk failure overlapping with the affected stripe.
Conclusion:
• 4+1 reduces the risk of catastrophic data loss during a rebuild, enhancing availability.
4. Storage Efficiency
• 4+1 uses 20% of the raw capacity for parity.
• 8+1 uses only 11.1% of the raw capacity for parity, leaving more usable space for data.
• While 8+1 provides better storage efficiency, this comes at the cost of increased rebuild times and a higher risk of data loss during recovery.
Conclusion:
• 8+1 is more efficient but trades off availability for capacity.
Summary of Comparison
Aspect 4+1 (Smaller Stripe) 8+1 (Larger Stripe)
Fault Isolation Better (fewer disks per stripe) Higher risk (more disks per stripe)
Rebuild Times Faster (fewer blocks to rebuild) Slower (more blocks to rebuild)
Risk of Overlap Lower risk of overlapping parity/data Higher risk of overlapping parity/data
Storage Efficiency Lower (20% parity overhead) Higher (11.1% parity overhead)
Availability Higher (faster recovery, lower risk) Lower (slower recovery, higher risk)
Best Practice Recommendation
• Choose 4+1:
-When availability, fault isolation, and faster recovery are priorities.
-For environments with high I/O workloads or failure-sensitive applications.
Choose 8+1:
-When storage efficiency is critical, and the risk of multiple disk failures is low.
-For environments with sequential workloads or where capacity is more important than recovery speed.
By prioritizing availability, 4+1 is generally the better option in a system with one-disk failure protection, as it minimizes downtime and recovery risks.
• If two disks fail in different stripes but in the same resiliency set, the system may recover, but this is not guaranteed (because the responsibility of the system is on only one disk failure)
• If two disks fails in the same stripe, data loss occurs
One response to “Dell powerstore relation between Resilency set and Dynamic resilency engine”
-
This really answered my problem, thanks!
VMware AVI-Deep dive inside Elastic HA N+M Mode vs Elastic HA Active/Active
May 23, 2024
In this post, I tried to clarify two complex contents inside VMware AVI (NSX Advance Load Balancer): Elastic HA N+M Mode vs. Elastic HA Active/Active.
To clarify this, we defined one scenario and compared these two features together using the same example.
Scenario Details:
•Number of virtual service placements: 20
•Virtual Services per Service Engine (SE): 8
1)Elastic HA N+M
In N+M HA mode, you have N active Service Engines (SEs) and M spare SEs to handle failures.
1.1 Calculate the number of active SEs required (N):
N = (20 VIRTUAL SERVICES/8 virtual services per SE)=(2.5)=3 active
1.2. Determine the number of spare SEs (M):
•M is typically 1 or more, depending on the desired redundancy and fault tolerance level. For simplicity, let’s assume 1 spare SE.
M = 1
1.3. Total number of SEs required (N+M):
Total SEs = N + M = 3 + 1 = 4
2)Elastic HA Active/Active
In Active/Active HA mode, all SEs are actively handling traffic, and the load is distributed among them. There are no designated spare SEs; instead, the load is redistributed in case of a failure.
2.1. Calculate the number of SEs required:
Total SEs = (20 virtual services/8 virtual services per SE) = 2.5= >3
2.2 Consider additional SEs for redundancy:
•To ensure redundancy, you typically add 1 or more SEs to handle failures smoothly. For a balanced approach, let’s assume 1 additional SE for redundancy.
Additional SEs = 1
2.3. Total number of SEs required:
Total SEs = 3 + 1 = 4
Summary:
•Elastic HA N+M: Requires 4 SEs (3 active + 1 spare).
•Elastic HA Active/Active: Requires 4 SEs (3 active + 1 additional for redundancy).
Both scenarios result in the same number of SEs required (4 SEs). The key difference is in how these SEs are utilized and the level of fault tolerance provided:
•N+M: Specific SEs act as spares, ready to take over in case of a failure.
•Active/Active: All SEs handle traffic, and the load is redistributed in case of a failure.
Now, we want to compare them in terms of distribution and failure:
1)Elastic HA N+M:
In N+M HA, you have N active SEs and M spare SEs. The primary focus is on ensuring that if an active SE fails, a spare SE is ready to take over the load without affecting the overall service.
Utilization in Elastic HA N+M:
1.1 Active SEs:
•SE1, SE2, and SE3 are actively handling traffic.
•Each SE can handle up to 8 virtual services.
•Distribution: SE1 handles 8, SE2 handles 8, SE3 handles 4 (since 20 services need to be distributed across 3 SEs).
1.2. Spare SEs:
•SE4 is a spare SE.
•It remains idle and only becomes active if one of the active SEs fails.
How it works:
•Under normal operation:
•SE1: 8 virtual services
•SE2: 8 virtual services
•SE3: 4 virtual services
•SE4: Idle (spare)
•If SE2 fails:
•SE4 takes over SE2’s 8 virtual services.
•The new distribution would be:
•SE1: 8 virtual services
•SE3: 4 virtual services
•SE4: 8 virtual services (previously handled by SE2)
2)Elastic HA Active/Active
In Active/Active HA, all SEs are actively handling traffic. There are no dedicated spare SEs; instead, the system relies on load redistribution to handle failures.
Utilization in Elastic HA Active/Active:
2.1.Active SEs:
•SE1, SE2, SE3, and SE4 are all actively handling traffic.
•Each SE can handle up to 8 virtual services.
•Distribution: SE1, SE2, and SE3 each handle 6 or 7 virtual services (since 20 services need to be distributed across 4 SEs).
2.2 Redundancy through load redistribution:
•If an SE fails, the remaining SEs redistribute the load among themselves
How it works:
•Under normal operation:
•SE1: 5 virtual services
•SE2: 5 virtual services
•SE3: 5 virtual services
•SE4: 5 virtual services
•If SE2 fails:
•The remaining SEs redistribute the 5 virtual services handled by SE2.
•The new distribution would be:
•SE1: 6-7 virtual services
•SE3: 6-7 virtual services
•SE4: 6-7 virtual services
–Comparison and Recommendation
Advantages of Elastic HA N+M:
1.Dedicated Spares: Having dedicated spare SEs ensures a quick takeover without affecting the load on other SEs.
2.Predictable Performance: The performance impact during a failure is predictable as spare SEs are always ready.
Disadvantages of Elastic HA N+M:
1.Resource Utilization: Spare SEs remain idle under normal operation, leading to inefficient resource utilization.
2.Higher Cost: Requires more SEs for the same level of service (as spare SEs add to the total SE count).
Advantages of Elastic HA Active/Active:
1.Efficient Resource Utilization: All SEs are actively handling traffic, maximizing the use of available resources.
2.Scalability: Easier to scale, as adding more SEs can distribute the load more evenly.
Disadvantages of Elastic HA Active/Active:
1.Load Redistribution: During a failure, remaining SEs need to handle the additional load, which could impact performance temporarily.
2.Complexity: More complex to manage, as the system needs to ensure even load distribution and quick adaptation during failures.
Which One is Better?
Elastic HA Active/Active might be better for most scenarios due to its efficient resource utilization and scalability. However, the choice depends on specific requirements:
•If you need predictable performance and can afford the cost of additional SEs, Elastic HA N+M might be the way to go.
•If you prioritize efficient resource utilization and are prepared to handle the complexities of load redistribution, Elastic HA Active/Active is generally more advantageous.
-
This really answered my problem, thanks!
What’s New VSphere 9.0
In this post, we want to talk about the most important new features in VSphere 9.0:
- Licensing
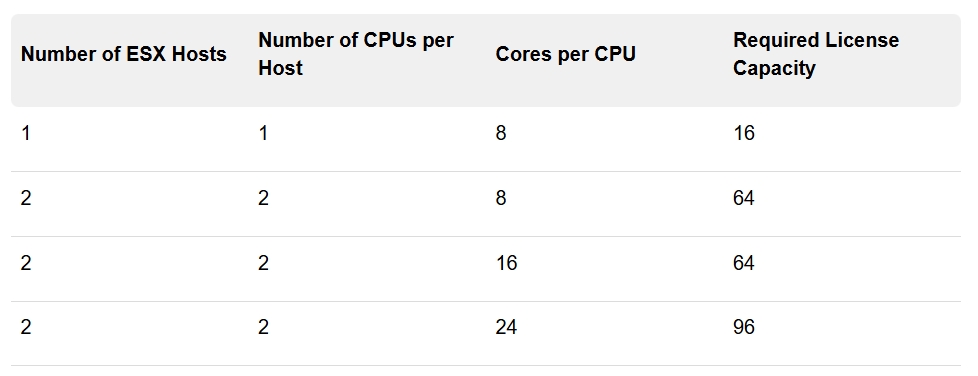
- vSphere 9.0 requires a minimum of 16 cores per CPU even if a CPU has fewer than 16 cores. If a CPU has more than 16 cores, additional CPU licenses are required
- The initial license that is automatically created in VCF Business Services console after you purchase a subscription is called a default license. The default license is a pool of capacity from all active subscriptions of the same product in the same Site ID. Available capacity is displayed in the unit of measure for the specific product. For example, if you purchase a VCF subscription for 500 cores, you receive a default license for 500 cores of VCF and you also receive a default license of 500 TiBs of vSAN, which are added in a separate license. If, on top of that, you purchase a vSAN add-on subscription for 200 TiBs, the new number of TiBs is added to your default vSAN license, and its capacity becomes 700 TiBs.
- There are two types of licenses – primary licenses, such as VMware Cloud Foundation and VMware vSphere Foundation licenses, and add-on licenses, such as vSAN add-on capacity or VMware Private AI Foundation with NVIDIA licenses. You no longer license individual components such as NSX, HCX, VCF Automation, and so on. Instead, for VCF and vSphere Foundation, you have a single license capacity provided for that product. For example, for VMware Cloud Foundation, the single license capacity provided for that product is VMware Cloud Foundation (cores). This is a primary license and you must assign it to your environment before you can assign an add-on license. Components are licensed automatically after you assign the primary license to a vCenter instance. For VCF and vSphere Foundation, you also receive VMware vSAN (TiB)capacity. You also receive VMware vSAN (TiB) capacity when you purchase vSAN as an add-on. The vSAN TiB license is called an add-on license.
- Primary licenses are the licenses for VCF and vSphere Foundation. They are per core based. The only assets in your environment which consume the capacity of your primary licenses are ESX hosts. To calculate the capacity you need for your environment, you need the total number of the physical CPU cores for each physical CPU on all ESX hosts in your environment. Most products have a minimum consumption rule of 16 cores per physical CPU. CPUs that have fewer than 16 cores consume 16 cores. For example, if you have 1 ESX host in your inventory, with 1 CPU, and 8 CPU cores per CPU, this ESX host will use 16 cores of your license total capacity because it is the minimum license capacity.
- To license your vCenter instance, assign either the VCF or vSphere Foundation license to your vCenter
- Increased minimum boot-bank size for ESX to 1 GB
- With ESX 9.0, the minimum boot-bank size for ESX is up from 500 MB to 1 GB. ESX 9.0 boot-banks are provisioned at 1GB or 4GB to accommodate essential system software. Environments upgraded from previous versions with a 500 MB boot-bank automatically migrate to the new 1 GB or 4 GB boot-bank during the installation process. A minimum of 32 GB of system disk space is required for proper operation.
- Reduced downtime upgrade is integrated with vCenter High Availability (HA) deployment
- Reduces downtime to less than 5 minutes under ideal network, CPU, memory, and storage conditions.
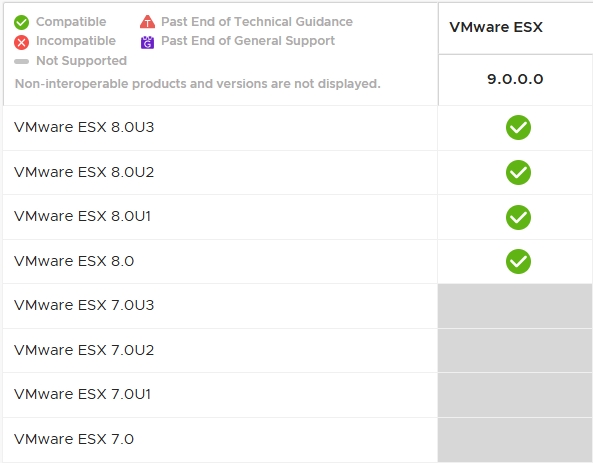
- Supported Upgrade Paths
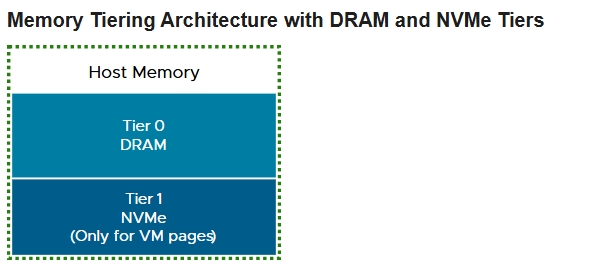
- Memory Tiering
- ESX 9.0 officially launches the Memory Tiering capability, which enables you to add NVMe devices locally to an ESX host as tiered memory. Memory tiering over NVMe optimizes memory utilization by allocating and moving VM memory pages between faster dynamic random access memory (DRAM) and NVMe devices on the host. This allows you to improve the host CPU utilization by increasing memory footprint and workload capacity, while reducing the total cost of ownership
- Memory Tiering combines DRAM (Tier 0) with the slower NVMe memory (Tier 1) to provide contiguous memory. Memory pages from NVMe are used only for VM memory allocations on an ESX host.
- With the Memory Tiering feature, you can increase the workload capacity with a minimal impact on performance. This allows you to add more VMs and workloads to the ESX host, thereby better utilizing the available CPU resources.
- By default, the Memory Tiering feature is deactivated.
- You can activate the Memory Tiering feature and configure the NVMe device on the ESX host to serve as tiered memory. Memory Tiering integrates seamlessly with DRS, which continuously monitors the ESX hosts within a cluster and places VMs to load-balance memory usage across the cluster.
- You can configure Memory Tiering either at a cluster or at a ESX host level.
- vSphere Requirements for Memory Tiering
- Component Requirements
- vCenter 9.0 and later
- ESX 9.0 and later
- Make sure that the ESX host is placed in Maintenance Mode before you activate, deactivate, or reconfigure Memory Tiering.
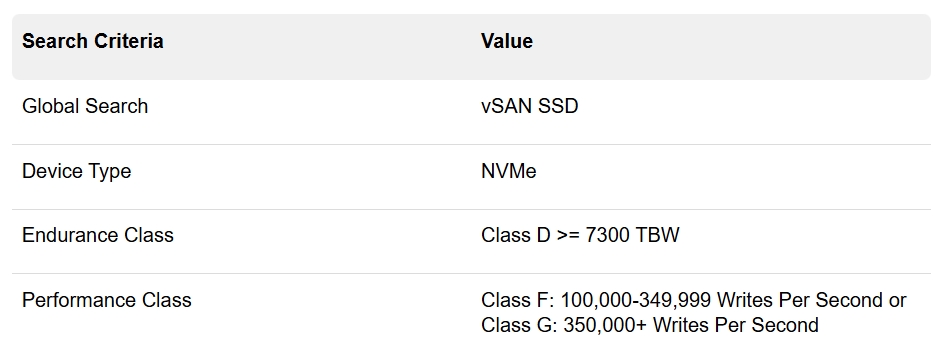
- NVMe devices used for Memory Tiering must be of a similar class to a vSAN cache device. Note that an already configured vSAN cache or data disk cannot be used for Memory Tiering
- NVMe devices cannot be over fabric or ethernet. They must be installed locally on the ESX host
- Configure NVMe devices with a tier partition. The tier partition cannot be larger than 4 TB
- Hot-plug and prepare to remove are not supported for an NVMe device being used for Memory Tiering.
- NVMe devices that are already part of a datastore, such as vSAN, cannot be used for Memory Tiering
- Component Requirements
- vSphere vMotion Optimizations for vGPU Workloads
- Virtual Hardware Version 22
- Support Boot over NVMe/FC SAN and NVMe/TCP SAN
- Snapshot enhancements
- ability to resume snapshot consolidation for offline VMs
- vCenter Appliance is now PhotonOS version 5.0
- vCenter 9.0, the default size of the log partition is 50 GB for any vCenter deployment
- Broadcom branding on the object and component icons in Center
- Virtual Private Cloud (VPC) in Center
- VCF 9.0 introduces Virtual Private Cloud (VPC) support in vCenter, enabling administrators to create VPCs and define subnets, either private or publicly advertised, to expose VMs externally by using external IPs.
- Custom Enhanced vMotion Compatibility (EVC)
- Starting with vCenter 9.0, you can create a custom EVC mode and apply it to your clusters or virtual machines. The custom EVC mode feature set is based on the highest set of features available in all selected hosts. If your vCenter instances are part of an Enhanced Linked Mode group, you can select hosts or clusters from any vCenter instance part of the Enhanced Linked Mode group
- Storage 4K native support
Leave a Reply